Showing posts with label OS. Show all posts

Thursday, January 8, 2015

[MAC OSX App recommend] InsomniaX for sleepless you laptop.

If you want to be sleepless you laptop? When you close your laptop cover, It will be sleep but you don't want it. Here is solution "InsomniaX"


Step 01. Access developer's page http://semaja2.net/projects/insomniaxinfo/
and click 'Latest Version' Link


Step 02. Download is started automatically


Step 03. After download, Unzip that file and Run 'InsomniaX' executable file.


Step 04. It's familiar screen. That's right? Click 'Agree'

Step 05. If password dialog pop up, type your password and click 'approve'


Step 06. Wow, In your menu bar there is 'InsomniaX'  icon like new moon. 


Step 07. Click that icon, you can choose options. Lid Sleep is a mode for sleepless when be opened up your laptop. Idle Sleep is is a mode laptop is closed.


Step 08. Choose options at least one, InsomniaX icon turn it black.


Step 08. In Preferences menu, you can choose Start up option, CPU Safety, etc...


If you want sleepless macbook? Install it and use it!

Wednesday, January 7, 2015

[Linux] How to change text in files with grep & perl command

  If you want to change some text in files, normally you use text editor. Is it right?
  But, If you use linux or unix like that, you can use grep & perl. When use that you are getting powerful. It's very comvenient and easy!


  First, I want to replace some text in .sql file. Because of that, I made .sql file with mysqldump command.

  Command : mysqldump -u[username] -p [databasename] > [destination file name]
 
  After that, you can see 'Enter password:' line. Then type your passwords. Now you got .sql file.

  Next step is changing text in .sql file with grep command

  1. Finding string in sub directories.
  Command : find . -name '*.*' | xargs grep "[string what you want find]"

  2. Finding string in sub directories and replace that with certain string
  Command : find . -name '*.*' -exec perl -pi -e 's/[string what you want to find]/[certain string what you replace with it]/g' {} \;

  If I run command "find . -name '*.*' -exec perl -pi -e 's/iloveyahoo/ilovegoogle/g' {} \;". Then I will get file there is ilovegoogle only not iloveyahoo.

  3. Finding string in a file and replace that with certain string
  Command : find . -name '[file name what you want to find in]' -exec perl -pi -e 's/[string what you want to find]/[certain string what you replace with it]/g' {} \;

  Yeah! It's so easy. Right?

Monday, September 29, 2014

How to move Adobe Illustator to second screen?

If you use Adobe Illustator in mac osx, you can see below screen.
Illustator doesn't have frame and can't move to second screen.
And! You can't move Illustator to another workspace......


Illustator doesn't have frame. 

Some tool boxes are missing! They are another screen.

If you want to move illustator to another workspace? You can't


Where is Illustator!!!! OMG...

Here is solution.
It's very simple.

In Illustator, Menu -> Window -> Application Frame
And Check It!
 Can you see that?


Wow! Now it has frame!!!!!!

And we can move it to another workspace!!!!!


Monday, May 19, 2014

How to home and end key remapping like windows in mac osx.

Have you ever used windows? And now you are using mac?
When I first time to use mac. It's very uncomfortable using home,end keys.

In mac. Home and End key is used like following images.

If you press home key when a cursor is in middle of line.


the cursor moves front of current document.
If you press end key? the cursor moves end of current document.

It's very uncomfortable.


Now we are going to change key mapping for home, end keys like windows pc.
Follow me!(there is 2ways for under osx 10.8 & over osx 10.9. Make your choice.)

# for under 10.8
Step 1. Open terminal.
- move to Library folder.
- make folder KeyBindings
- move to KeyBindings folder
- make file DefaultKeyBinding.dict
- paste this contents.
{
"\UF729" = "moveToBeginningOfLine:"; 
"\UF72B" = "moveToEndOfLine:"; 
"$\UF729" = "moveToBeginningOfLineAndModifySelection:";
"$\UF72B" = "moveToEndOfLineAndModifySelection:";
}

- save file


Step 2. Do you finish to make file? Yeah~! Let's reboot your mac!.

Step 3. Just use! Check your home, end keys.


If your keys don't work what you think?
Follow next steps.
# for over osx 10.9


Step 01. access KeyRemap4MacBook web site.
https://pqrs.org/macosx/keyremap4macbook/index.html.en

And download KeyRemap4MacBook for your mac.
I'm going to download 9.3.0 for OS X 10.9


Step 02. Is this finished? Run dmg file.


Step 03. In a media what you run, there is one pkg file. Excute that.


Step 04. Check Introduction message. Click 'Next' button.


Step 05. Check your install location. Click 'Install' button.


Step 06. You need authority. type your passwords and click 'Software Install' button.

Step 07. Waiting for some seconds.


Step 08. It's done. Click 'Close' button.


Step 09. In the launchpad, KEY icon is there! Click that.


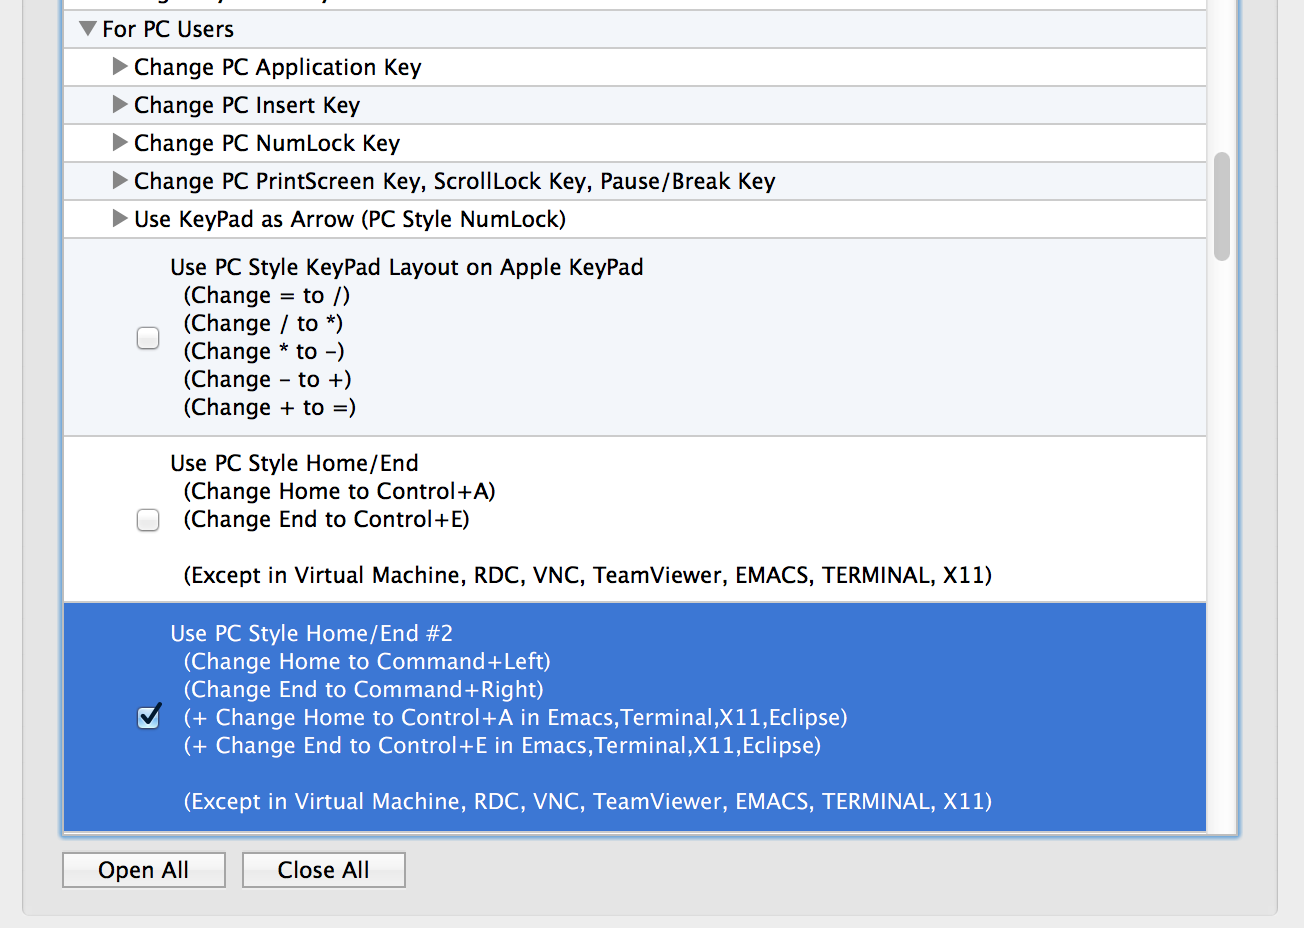
Step 10. In first screen. You will find for PC Users -> Use PC Style Home/End #2.
Check there. It's done. Just use it likes windows.


It's easy way to remap key. find some other things. there are many good options.
Have a good mac life~ :-)

Sunday, May 18, 2014

How to make bootable usb on mac for linux, window, ETC OS.

Hello everyone~!
Today tutorial is for to make bootable usb for install some O.S(windows, linux, etc...)

First. You need os iso file likes ubuntu-14.04-server-i386.iso and usb stick (You can use external usb hard drive too).

Let's follow this steps.


Step 1. We have to convert iso to img file by hdituil.
Open your terminal and run this command.

hdiutil convert -format UDRW -o ubuntu-14.04-server-i386.img ubuntu-14.04-server-i386.iso

This command convert iso to img.
(It shoud be changed with your correct file name.)


Step 2. After run hdiutil command. See your file name. That has .dmg extension. We can change this with mv command. Like this.

mv ubuntu-14.04-server-i386.img.dmg ubuntu-14.04-server-i386.img 


 Step 3. run GUI disktuil or diskutil list command.
See disk identifier lisk diskX. Keep that X.


Step 4. Right click usb partition and click unmount menu. Just do unmount, don't eject.


 Step 5. You can see like this screen. Usb partition is disabled.


 Step 6. Run this command
sudo dd if=ubuntu-14.04-server-i386.img of=/dev/rdisk1 bs=1m
And waiting for finish this.

If finish this? You can usb this usb for bootable or install media.


If occur error. You use Grub dd maybe. Change 1m to 1M.
I hope you success for this!